The 2026 Reality of Photographing Clothes to Sell Online
6-8 photos per listing +94% conversion vs single-photo listings $0 budget possible with phone + AI 30 sec AI enhancement vs 30 min Photoshop
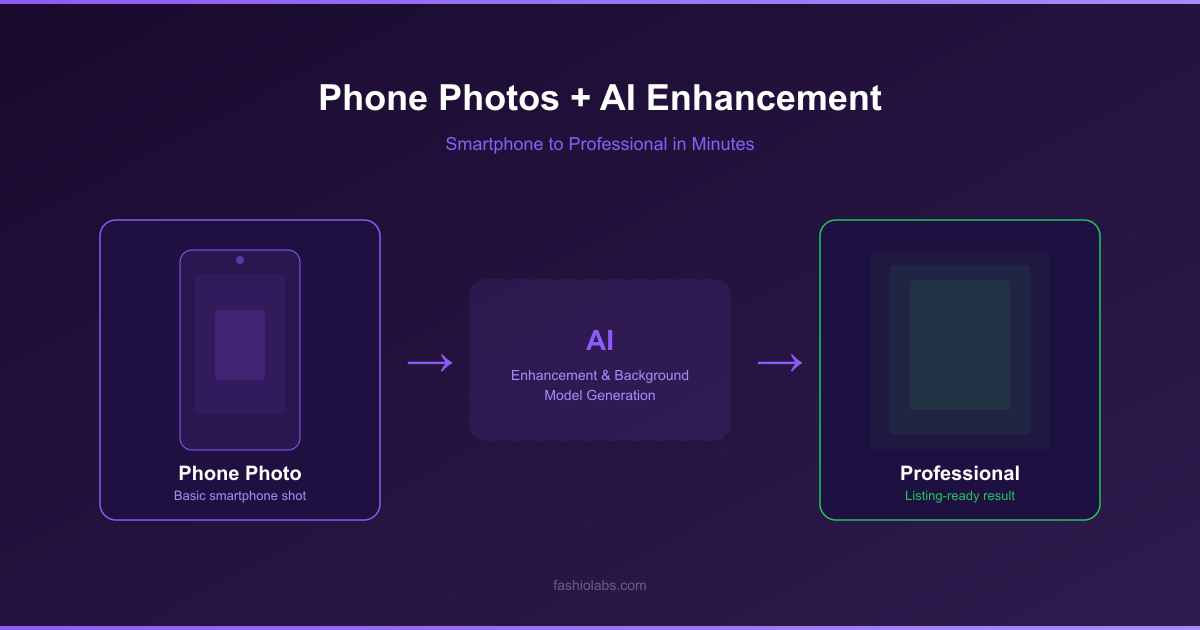
Photographing clothes to sell in 2026 is no longer about owning a DSLR — it's about a repeatable system. A phone, a window, a tripod, and an AI enhancement pipeline produce listings that out-convert most legacy studio setups, because the AI step enforces the consistency that buyers actually respond to.
Most clothing sellers lose sales not because their garments aren't good, but because their photos aren't telling buyers what they need to see. A buyer scanning a marketplace listing in two seconds decides: does this look real, does the fit look right, can I trust this seller? Every answer comes from the photos.
The good news for 2026: you don't need a $5,000 setup to nail every one of those signals. The combination of a modern phone camera, a basic lighting plan, and an AI enhancement workflow can produce listing imagery that competes directly with full studio output — and ships in a fraction of the time.
This guide walks the entire system from gear to capture to enhancement: phone-only setup, DSLR setup, lighting, backgrounds, angles, the five-photo system every listing needs, the AI workflow that turns rough shots into polished imagery, and the marketplace-specific tips that move the conversion rate.
What "Good" Looks Like for Clothing Photos That Sell
Before gear, before lighting, before any AI tool — the standard. A clothing photo that sells does five things:
- Shows true color — the on-screen color matches what arrives in the box. Color mismatch is the #1 cause of returns.
- Shows true fit — the buyer can read how the garment falls on a body, not just lies on a table.
- Shows fabric texture — knit vs woven, slubbed vs smooth, matte vs sheen. Texture is what separates "cheap-looking" from "considered."
- Shows scale — small leather goods next to a hand, pants next to shoes, dresses on a body. The buyer has to know how big it actually is.
- Looks consistent with the rest of the store — same background, same lighting, same crop. Inconsistency reads as amateur.
Hit those five and your conversion rate will move regardless of whether the photo was taken on an iPhone or a Hasselblad. Miss them and no amount of expensive gear will save the listing.
Phone-Only Setup — The $100 System That Works
For most sellers — especially those listing on Depop, Poshmark, eBay, Etsy, and small Shopify stores — a phone-based setup is not just adequate, it's optimal. Faster to set up, faster to shoot, and the AI enhancement step closes the gap to professional output.
| Item | Why You Need It | Approx. Cost |
|---|---|---|
| Phone with portrait mode | Any iPhone 12+ or equivalent Android — 12MP+ sensor | Already owned |
| Tripod with phone mount | Sharp focus, no hand shake, consistent height across listings | $25-$40 |
| White seamless paper or vinyl | Clean backdrop for marketplace-compliant white background shots | $20-$50 |
| Two clamp lights with 5500K bulbs | Daylight-balanced fill light for cloudy days or evening shoots | $30-$60 |
| White foam board reflector | Bounce light into shadows on the opposite side from your main light | $5-$10 |
| Mannequin, dress form, or hanger | Lets garment hang naturally, shows fit without a model | $30-$100 |
| AI enhancement subscription | Background, color, upscale, on-model transfer — replaces $$ Photoshop work | $0-$30/month |
Total cap: roughly $200 for a setup that can produce hundreds of professional listings. That's roughly the cost of one outsourced studio shoot day — and you own the setup forever.
DSLR / Mirrorless Setup — When the Upgrade Is Worth It
The phone setup wins for most sellers. The DSLR or mirrorless setup makes sense when you're shooting 100+ SKUs per week, building a wholesale linesheet, or your brand positioning requires premium imagery for editorial campaigns. Here's the honest comparison:
- $100-$200 total kit cost
- Setup in 10 minutes per session
- Native HDR and computational photography
- AI enhancement closes the resolution gap
- Ideal for Depop, Poshmark, eBay, small Shopify
- One operator, one device
- Files load fast on marketplace apps
- Can shoot anywhere with daylight
- $2,000-$8,000 in body, lens, lighting, accessories
- Setup 30-45 minutes per session
- Larger sensor, better low-light performance
- RAW files allow deeper post-processing
- Required for print-resolution catalog work
- Typically needs a dedicated shooting space
- Bigger files = slower upload pipeline
- Best for high-volume brands and editorial
The honest answer for most clothing sellers in 2026: start with the phone setup, prove the business, and only upgrade to DSLR once you're shooting more than 100 SKUs a month or your buyers demand print-resolution imagery.
Lighting — The One Thing That Separates Amateur from Professional
If you only fix one thing about your current product photos, fix the lighting. Bad lighting can't be rescued by any camera. Good lighting makes a phone photo look like studio output. Three reliable lighting setups:
Setup 1: Window Light + Reflector (Free)
Position your shooting surface or mannequin next to a north-facing window (or any window without direct sun). Place a white foam board reflector on the opposite side of the garment to bounce light into the shadows. Shoot during mid-morning or mid-afternoon for the softest, most consistent light. This setup costs nothing and produces results that compete with paid setups.
Setup 2: Two Softboxes at 45 Degrees
Two 5500K LED softboxes positioned at 45 degrees to the garment, one slightly higher than the other for subtle dimension. White seamless backdrop behind. This is the standard ecommerce setup — predictable, consistent, and replicable session after session. Total kit: $80-$150.
Setup 3: Ring Light + Fill (For On-Mannequin or Flat Lay)
An 18-inch ring light directly in front of the garment plus a single side fill creates even illumination with minimal shadow. Works especially well for jewelry, accessories, and small leather goods where shadow detail can hide texture.
Mixed light sources — daylight from a window plus warm tungsten room lights plus a cool LED ring — produce color casts that no AI tool can fully correct. Pick one light source temperature and kill every other light in the room. Daylight (5500K) only, or tungsten (3200K) only, never both. Your color accuracy across the entire store depends on this single discipline.
Backgrounds — Match the Marketplace
The right background depends on where you're selling. Marketplace algorithms and buyer expectations differ significantly. Don't shoot one background and force it across every channel — shoot once and use AI to generate the variants.
| Platform | Preferred Background | Notes |
|---|---|---|
| Amazon | Pure white (#FFFFFF), 85% frame fill | Required for main image. Lifestyle allowed in additional slots. |
| eBay | White preferred, neutral acceptable | Cluttered backgrounds penalized in search ranking. |
| Etsy | Lifestyle, textured, or branded neutral | Pure white actually under-performs — buyers want craft context. |
| Depop | Lifestyle, vintage, on-model | Identity matters as much as the garment. White feels corporate. |
| Poshmark | Mix of white and lifestyle | Hero shot on white, additional shots in lifestyle context. |
| Shopify (your store) | Brand-consistent neutral | Match the rest of your site. Consistency > "perfect." |
| Instagram / TikTok | Editorial, lifestyle, on-model | 9:16 vertical, social-native aesthetic. |
The efficient move: shoot every garment once on white seamless, then use AI background replacement to generate the lifestyle, branded, and platform-specific versions. One shoot, every variant.
The Five-Photo System Every Listing Needs
Buyers scan listings in a predictable order. Hero shot → details → fit → context → trust signals. Cover all five and the listing converts. Skip any one and the listing leaves money on the table.
-
The Hero Shot — Front, Clean, On Background
The main image that loads first in search and on the listing page. Garment centered, front-facing, on mannequin or hanger against your background of choice. Even lighting, no shadows on the backdrop, no clutter. This single image carries roughly 60% of the click-through decision. Shoot it once, get it right, and use it as the listing's hero across every channel.
-
The Back View
Same setup, same lighting, garment rotated 180 degrees. The back view is what most amateur sellers skip — and what serious buyers always check. Shows construction, fit, and details (back zippers, buttons, drape) that the front can't communicate. For dresses, knits, and outerwear, the back view often closes the sale.
-
The Detail Close-Up
A macro or zoomed shot showing fabric texture, stitching, label, hardware, or print detail. This is the "trust" photo — the one that signals "this is a real, considered garment, not a generic dropshipped item." Use phone macro mode or a 50mm lens on DSLR. Crop tight, lighting bright, no Instagram filters.
-
The Fit Shot — On Model or Mannequin
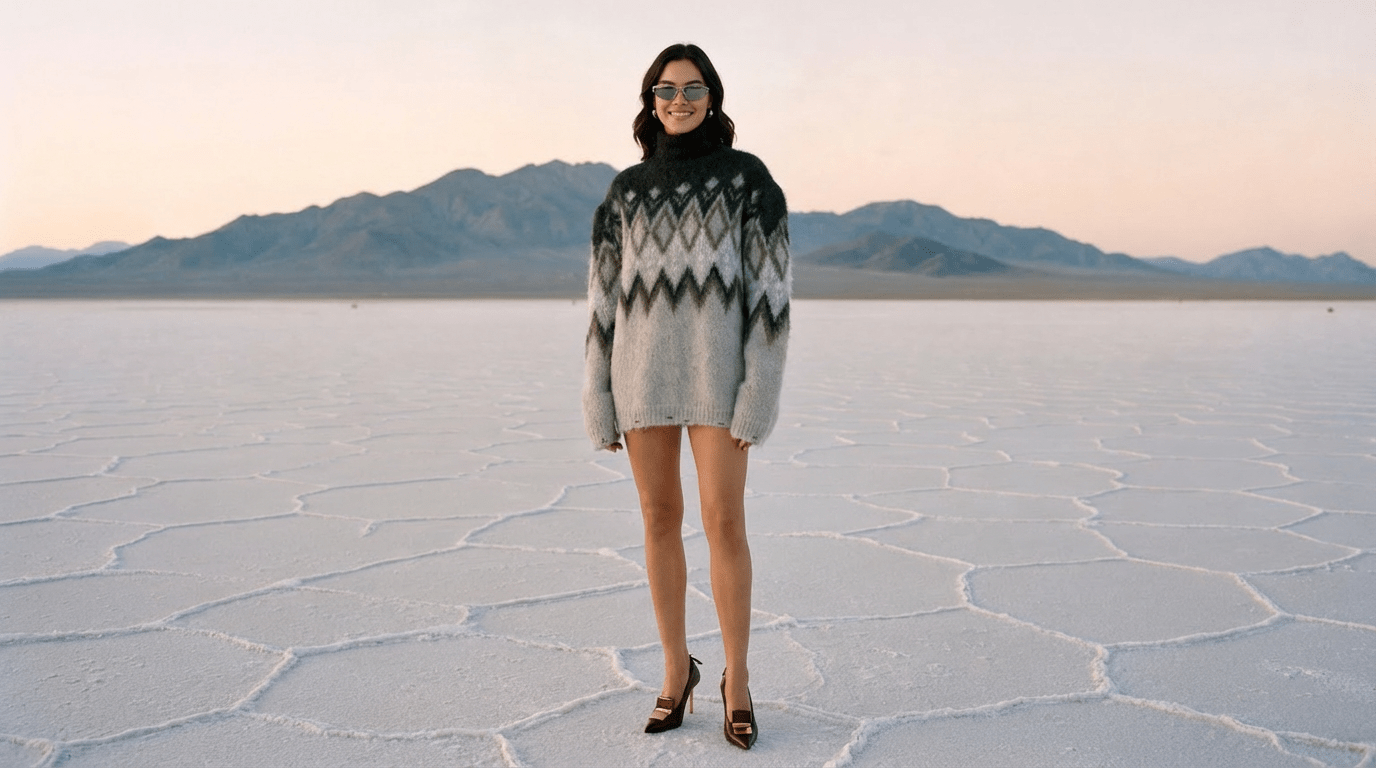
The buyer needs to see how the garment falls on a body. If you don't have a model, use a dress form or mannequin. If you only have a hanger shot, use an AI tool like Amateur to Professional to transfer the flat-lay or hanger image onto a virtual model. The fit shot is non-negotiable for conversion on dresses, pants, jackets, and anything where drape matters.
-
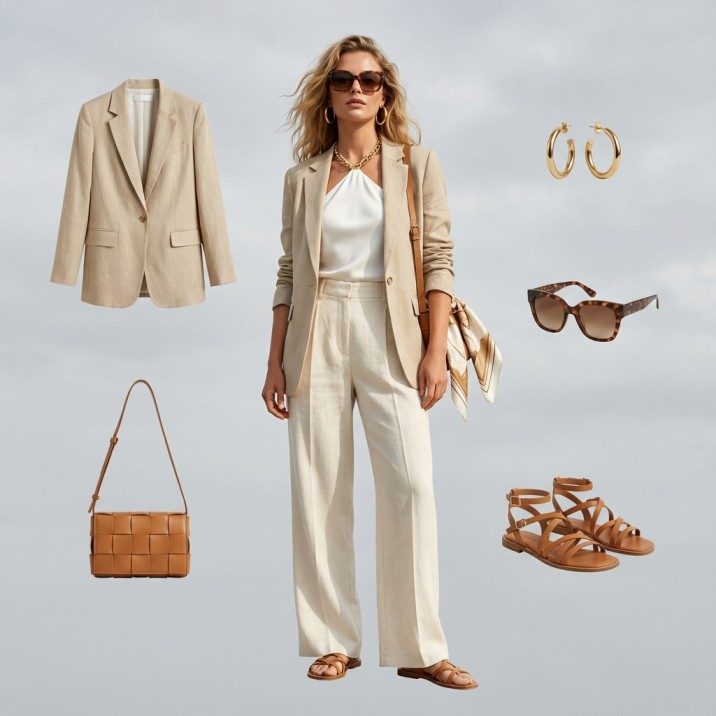
The Context Shot — Scale and Styling
One photo that shows the garment in styled context — paired with shoes and accessories, on a model in environment, or in a flat-lay scene that communicates how it's meant to be worn. This is the photo that nudges undecided buyers from "interesting" to "I'd wear this." For Etsy, Depop, and Instagram-driven traffic, context shots often outperform every other image in the listing.
The AI Enhancement Workflow — Where Phone Photos Become Professional
This is the step that closes the gap between amateur capture and professional output. The AI enhancement pipeline runs in roughly 30 seconds per image and replaces hours of Photoshop work.
The core pipeline for every clothing photo:
-
Clean the Background
Run the raw photo through Remove Background for a transparent or pure-white background. This single step elevates a phone photo to marketplace-compliant in seconds. Save the cutout as a separate layer so you can recompose against multiple background variants for different platforms.
-
Convert Hanger or Mannequin to Flat-Lay (Optional)
If your raw shot is on a mannequin and you need a clean flat-lay aesthetic, run it through Mannequin to Flat Lay. Useful for Etsy and Instagram where flat-lay aesthetic outperforms on-mannequin in some categories.
-
Transfer to a Virtual Model
For listings where on-body imagery converts better — anything where fit matters — run the flat-lay through Flat Lay to Catalog Creator to generate an on-model version. The garment stays accurate; the model is AI-generated, brand-consistent, and reusable across your entire catalog.
-
Upscale and Sharpen
Pass through Fashion Photo Upscale to lift resolution to 4K or higher. This is critical for any listing where buyers will pinch-zoom into fabric detail — most marketplaces show full-resolution images on tap-to-zoom and a soft image kills trust.
-
Color Correct and Polish
Run a final pass through AI Image Editing for color correction, contrast adjustment, and any final cleanup (stray hair, lint, wrinkles). Match your color profile to whatever was in front of the camera — accuracy here is what prevents returns.
-
Reframe for Every Platform
Final step: Photo Reframe exports each image in the aspect ratios you need — 1:1 for Amazon and Instagram, 4:5 for vertical scroll, 9:16 for Reels and TikTok, 16:9 for YouTube. One source image, every variant.
The phone is the camera, the window is the lighting, and the AI is the post-production team. Together they replace a $4,000 studio setup with something better — because it's repeatable. Every listing comes out the same way, every time.
Angles — The Five-Angle System That Reads as Professional
Inconsistent angles across listings are the fastest way to signal "amateur store." Pro stores shoot every garment from the same five angles, in the same order, at the same crop ratio. The result is a store page where every product looks like it belongs to the same brand.
| Angle | What It Communicates | Camera Position |
|---|---|---|
| Front Straight-On | Silhouette, print, primary design | Chest height for on-mannequin, overhead for flat-lay |
| Back Straight-On | Construction, back details, drape | Same height as front for consistency |
| 45-Degree Three-Quarter | Depth, shape, how garment moves | Chest height, garment rotated 45 degrees |
| Detail Macro | Fabric, stitching, hardware, label | Close enough to fill frame with detail |
| Lifestyle / Context | How garment is worn, scale, styling | Eye level on model, slightly above for flat-lay styling |
Set up the camera once at the right height, mark the position with tape, and shoot every garment to that same setup. Consistency is what makes a store look professional — not expensive gear.
Marketplace-Specific Tips That Move Conversion
Each marketplace rewards different visual cues. Understanding what each platform wants — and shooting once but adapting the output to every channel — multiplies your conversion rate without multiplying your shoot time.
Amazon — White, Centered, 85% Frame Fill
Amazon's main image policy is non-negotiable: pure white background (#FFFFFF), garment fills 85% of the frame, no text, no graphics, no additional objects. Failure to comply gets the listing suppressed. The good news: this is exactly what your white seamless + AI background replacement workflow produces.
Etsy — Lifestyle Wins, White Loses
Etsy buyers are looking for craft, story, and uniqueness. Pure white backgrounds actually under-perform here. Use textured neutrals (linen, wood, concrete) for the hero, then add styled context shots for slots 2-5. The Etsy algorithm also rewards listings that use all 10 image slots.
Depop — Identity and Aesthetic Over Product
Depop is closer to Instagram than to Amazon. On-model lifestyle shots dominate; flat-lays and on-mannequin shots feel commercial. If you don't have a model, use AI to generate an on-model version of your flat-lay using Flat Lay to Catalog Creator. The seller's identity shows in the consistent aesthetic across listings.
eBay — Clean and Trustworthy
eBay buyers prize transparency. White or neutral background, full garment visible, clear detail shots, and at least one shot that proves the item is real (label, tag, condition close-up). Listings with 8+ photos consistently outperform listings with 1-2 photos by margins above 90%.
Poshmark — Hero Plus Styling
Hero shot on white or neutral, then styled flat-lays with shoes and accessories. Poshmark buyers respond to "how would I style this" cues. Pair garments with adjacent items to suggest outfit completion.
Shopify (Your Own Store) — Brand Consistency
On your own site, the rules are whatever you make them — but they have to be consistent. Same background across the entire catalog, same lighting, same crop ratios, same model where applicable. Brand-consistent stores convert dramatically better than stores with mixed visual systems.
The Cost Comparison — Old Way vs Phone + AI
| Approach | Setup Cost | Per-Listing Cost | Time per 10 Listings |
|---|---|---|---|
| Outsourced Studio | $0 | $50-$150 per garment | 3-5 day turnaround |
| DSLR + Manual Photoshop | $2,000-$5,000 | 30-60 min editing per listing | 1-2 full days |
| Phone + AI Workflow | $100-$200 | Roughly $0-$3 in AI credits | 2-4 hours total |
The phone-plus-AI approach is roughly 95% cheaper than studio outsourcing and 80% faster than DSLR-plus-Photoshop. The output quality, after AI enhancement, is functionally indistinguishable for marketplace listings.
Run Your First Clothing Photo Through Fashio AI Free
Background replacement, color correction, upscale, flat-lay to on-model conversion — every step of the enhancement pipeline on Fashio AI's free tier. No watermarks, full commercial rights, instant export.
Try Fashio AI Free →Color Correction — The Skill That Stops Returns
Color mismatch between photo and physical product is the single largest cause of clothing returns. A buyer expects sage green and receives forest green; that's an immediate return and a negative review. Three rules for color accuracy:
- Shoot under one light temperature. 5500K daylight balanced. No mixed sources.
- Custom white balance on your camera. Most phones do this automatically; verify with a quick test shot of a white sheet of paper.
- Pass through AI color correction. AI tools can sample the actual garment color (from a swatch you upload) and normalize every photo across the listing to match.
Doing this consistently across every listing drops your return rate measurably and protects your seller rating.
What to Do If You Can't Hire a Model
Most independent clothing sellers can't afford to book a model for every drop. Three workable substitutes:
Option 1: Mannequin or Dress Form
The fastest physical solution. Garment falls naturally, shows fit without showing a face. The downside: mannequins read as commercial and don't help on platforms like Depop or Instagram. The fix is to run mannequin shots through AI to either clean them up further or transfer to a virtual model.
Option 2: Ghost Mannequin (Invisible Mannequin) Effect
Classic ecommerce technique — photograph the garment on a mannequin, then digitally remove the mannequin so the garment appears to float in 3D form. The traditional Photoshop method takes 20-40 minutes per garment. The AI method using Mannequin to Flat Lay takes seconds.
Option 3: AI Virtual Model
The 2026 default for solo sellers and small brands. Photograph the garment as a flat-lay or on-mannequin, then use AI Fashion Model Generator to create a brand-consistent virtual model, and Virtual AI Fashion Try-On to put the garment on that model. The same model can be reused across every listing for instant brand consistency.
Some marketplaces require disclosure when product imagery features AI-generated models. Check the policies for Amazon, Etsy, and Shopify in your region. Most platforms allow AI imagery without explicit disclosure if the underlying product representation is accurate — but the rules are evolving rapidly through 2026. When in doubt, add a small "Image: AI-generated model, real garment" line to the listing description.
Props, Styling, and the Details That Convert
Beyond the garment itself, the small touches matter. Strong listings consistently include:
- Scale references — a hand next to small accessories, shoes next to pants, a coin next to jewelry. Buyers can't tell size from a flat photo without scale context.
- Styling pairs — pair the garment with adjacent items (the shirt with a jacket, the dress with shoes). Suggests outfit completion and lifts average order value.
- Texture proof — close-up that shows the actual weave or knit. The texture shot prevents "this doesn't feel like the photo" returns.
- Label and care tag shots — for vintage and resale, label shots build trust. For new garments, they signal quality.
- Worn vs not-worn pair — show the garment hanging and on a body in the same listing. Buyers compare drape.
The Full Repeatable Workflow — Start to Finish
-
Pre-Shoot Prep (5 min per garment)
Steam or iron every garment. Lint roll. Adjust collars, hems, sleeves. A garment with wrinkles photographs as a garment with wrinkles — and AI can't fully fix it.
-
Shoot the Five Angles (3-5 min per garment)
Front, back, three-quarter, detail, context. Same lighting, same camera height, same crop ratio across every garment.
-
Bulk Run Through AI Enhancement (2-3 min per batch)
Background, color correct, upscale, optional model transfer, platform reframe. Process a full session of 20-30 garments in 10 minutes.
-
Export per Platform
White-background hero for Amazon and eBay, lifestyle for Etsy and Depop, vertical for Reels and TikTok. Same source images, different exports.
-
Upload and Test
Watch the first 48 hours of clicks and conversions. The hero image is the lever — if the hero is converting, the listing will work. If not, replace the hero first and re-test.
Fashio AI Tools Used in This Workflow
- Remove Background — clean white backgrounds for Amazon, eBay, Shopify
- Amateur to Professional — transform phone shots into studio-quality output
- Mannequin to Flat Lay — ghost-mannequin effect in seconds
- Flat Lay to Catalog Creator — flat-lay to on-model conversion
- AI Fashion Model Generator — brand-consistent virtual models
- Virtual AI Fashion Try-On — put garments on the virtual model
- Fashion Photo Upscale — 4K resolution for pinch-zoom listings
- AI Image Editing — color correction and final polish
- Photo Reframe — export every aspect ratio from one source
What This Looks Like in Practice — Three Seller Profiles
Vintage Reseller on Depop (20 listings/week)
Shoots every garment on a dress form by a window. Phone on tripod, two angles, one detail close-up. Bulk processes through AI background removal and on-model transfer. Total time per listing: under 5 minutes including the AI step. Conversion rate doubled within the first month of standardizing the workflow.
Indie Designer on Shopify (8 SKUs per drop, 4 drops/year)
Phone-based shoots on white seamless. Each garment shot in five angles. AI workflow generates hero shots, on-model variants using a single brand-consistent virtual model, lifestyle context shots, and platform-specific exports. Total shoot day per drop: under 4 hours.
High-Volume Reseller on eBay (50+ listings/week)
Mannequin-based setup with two softboxes. Three angles per garment, batch upload to AI pipeline, automated background replacement and color correction. Reframe export sends each listing's images to eBay-spec dimensions. Listing creation time dropped from 18 minutes to 4 minutes per item.
Going Deeper — Related Reading
If you're building out your full ecommerce photography stack, these guides go deeper on specific parts of the pipeline:
- Product Photos on a Phone — The AI Enhancement Workflow — the phone-specific deep dive
- Flat Lay Photography to On-Model AI Workflow — turning flat-lay shots into on-body imagery
- AI Lookbook Generator Guide — going from single product shots to coordinated lookbook campaigns
- AI Product Photography Complete Guide — broader context on AI in ecommerce imagery
Key Takeaways
- A phone, a window, a tripod, and an AI enhancement workflow produce listings that compete directly with full studio output
- The five-photo system (hero, back, three-quarter, detail, context) covers every conversion signal buyers need
- Single light source temperature is the most important lighting discipline — mixed sources cause color casts no AI can fully fix
- Shoot once on white seamless, then use AI background replacement to generate every platform-specific variant
- For on-body imagery without a model, transfer flat-lays to a brand-consistent virtual model using Flat Lay to Catalog Creator
- Marketplace rules differ — Amazon wants white, Etsy wants lifestyle, Depop wants on-model identity. One shoot, multiple exports.
- The phone-plus-AI workflow is roughly 95% cheaper than outsourced studio shoots and 80% faster than DSLR-plus-Photoshop with comparable output for listings
Photograph Smarter — Try Fashio AI Free
16 fashion AI tools cover every step of the clothing photography pipeline — background, color, on-model transfer, upscale, reframe. Free tier, no watermark, full commercial rights.
Try Fashio AI Free →FAQ: How to Photograph Clothes to Sell
What is the best way to photograph clothes to sell online?
The best way is a repeatable five-photo system per listing — hero front view, back view, three-quarter angle, detail close-up, and a styled context shot — captured with consistent lighting (one daylight-balanced source), shot at the same camera height and crop ratio across every garment, and processed through an AI enhancement pipeline for background, color correction, and resolution. Consistency across listings drives conversion as much as image quality on any single shot.
Can you photograph clothing to sell with just a phone?
Yes. A modern phone with portrait mode, paired with a tripod, a window or single softbox, a white seamless backdrop, and an AI enhancement workflow produces ecommerce-ready imagery for every major marketplace including Depop, Poshmark, eBay, Etsy, and Shopify. The phone handles capture; AI handles the post-production work that used to require Photoshop. For listings under 4K display resolution — which is almost every marketplace — the output is indistinguishable from DSLR.
What lighting is best for clothing product photography?
Soft, even, diffused light from a single color temperature source. Either north-facing window light with a white reflector to fill shadows, or two 5500K LED softboxes at 45 degrees to the garment. Avoid direct sunlight, mixed light sources (window plus tungsten plus LED), and overhead room lights. Daylight-balanced 5500K is the standard for ecommerce because it photographs colors accurately and matches what buyers will see at home.
What background should I use for selling clothes online?
Pure white (#FFFFFF) is the marketplace default — required for Amazon, preferred for eBay and Shopify hero shots. For Etsy, Depop, Poshmark, and Instagram, lifestyle or textured neutral backgrounds (linen, wood, concrete) typically outperform plain white. The efficient workflow is to shoot every garment once on white seamless and then use AI background replacement via Remove Background to generate every platform-specific variant from a single source image.
How do I photograph clothing without a model?
Four options: flat-lay on a clean surface, on a dress form or mannequin, on a hanger against a wall, or a ghost mannequin (invisible mannequin) effect. For listings where on-body imagery converts better, the best 2026 option is to shoot flat-lay or mannequin and then transfer to a virtual model using Flat Lay to Catalog Creator. The garment representation stays accurate while buyers get the fit context they need.
What angles should I shoot clothing from?
Use a five-angle system per garment: front straight-on, back straight-on, 45-degree three-quarter, close-up detail (fabric, stitching, hardware, label), and lifestyle context. For flat-lays shoot directly overhead. For on-mannequin shoot at chest height to avoid distortion. The critical part is consistency — same angles, same heights, same crops across every garment in the store. Inconsistency reads as amateur regardless of any other quality signal.
How can AI improve my clothing photos for sale?
AI enhancement adds five layers every ecommerce listing needs: clean background replacement (one shoot, every platform variant), color correction matched to the actual garment, sharpening and detail recovery, resolution upscale via Fashion Photo Upscale for pinch-zoom listings, and optional transfer to a virtual model for on-body imagery. A 30-second AI pipeline replaces hours of Photoshop work and enforces the consistency across listings that drives conversion.
How many photos should each clothing listing have?
Aim for 6-8 photos per listing on platforms that support image carousels. Hero shot, back view, three-quarter angle, detail close-up, hardware or label shot, on-model or styled context shot, scale reference, and one lifestyle worn shot. Marketplaces with 8+ photos consistently show conversion lifts above 90% versus listings with 1-2 photos. The AI workflow makes generating 8 variants from a single shoot trivial — use the slots.